Elementor 101 – build a better WordPress website today!
If anyone tells you that building a website is quick and easy, they’re lying to you – or trying to sell you something.
Starting a new website Is a time consuming task and If you are new to web design – it can be even more so.
These days there are many tools available to help speed up the web design process and when it comes to WordPress, one of the most popular is Elementor.
What is Elementor?
Simply put - Elementor is an add-on for WordPress that gives you design tools to a build website.
Elementor is a drag-and-drop page builder plugin, It helps you create beautiful website designs using a visual page editor - so you can see what your doing, while you do it.
Is Elementor a WordPress theme or a plugin?
Elementor is a WordPress plugin. Elementor is not a theme.Why is Elementor popular?
It's a popular add-on because it allows people with little or no webdesign knowledge to create a website in a short period of time. It's also popular among freelancers and webdesign companies because it allows them to deliver client websites faster.Is Elementor free?
Yes and no. There is a free version of Elementor which comes with the basic design options - more than enough to get you started!. There is also a paid version which includes additional options and depending on how much custom work you plan todo - might not be worth the $99 price tag.Do I need the paid version of Elementor?
No. All PremiumPress themes use the tools found in the free version only.How to install Elementor?
Step 1- Log in to WordPress Admin
- The first step is to log in to the WordPress admin area.
- Enter your user name and password here to log in WordPress.
- Once you have successfully logged into your WordPress account, you will see the Dashboard panel where you can control all of your website settings.
- Here is how your Dashboard will look like.

Now, head over to the plugins section wherefrom we will download the latest version of Elementor page builder.
Step 2 - Search WordPress Plugins Repository
- Head over to WordPress plugin repository.
- Now click on the Plugins.
- Click on Add New > search plugin.
- Here you can see plenty of plugin options.

Step 3 - Add Elementor and search
- Now in the search bar, add keyword "Elementor.".
- Click on search, and you will see the Elementor page Builder option.

Step 4:Install and activate
I have already installed the Elementor plugin, as you can see that update now option is visible here. And when you are installing your Elementor plugin, you will see an icon with Install now button where you can install the plugin.

Once you have successfully installed the Elementor plugin, you can click on activate the plugin.
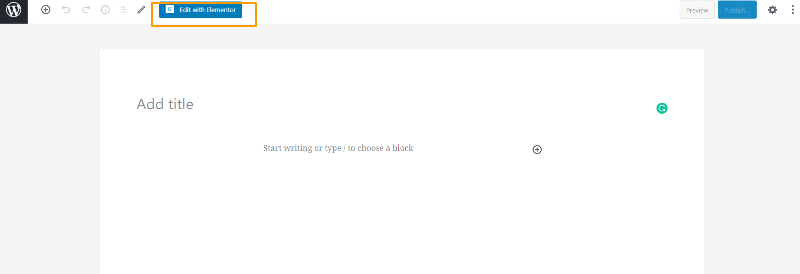
Now onward, whenever you will create a page "Edit with Elementor" option will appear. When you click on the edit with the Elementor tab, you will enter into the Elementor interface, where you can edit your page as per your requirements.

When you click on this blue tab, you will enter into the Elementor builder interface, where you can edit your page.

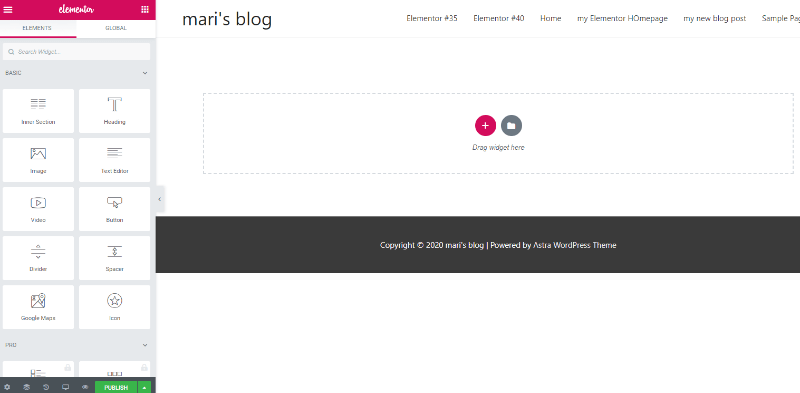
Here is how the Elementor interface will look like. You can see, there are plenty of elements that can help you in crafting a unique layout of your page.

So, here ends our Elementor plugin installation. Elementor stands out to other page builders because of its user-friendliness and the drag-and-drop feature. You can install the free version for trial, and the good thing is, it doesn’t force you to buy the pro version, and the free version comes with pretty cool features as well.
Top 5 Elementor Alternatives
Elementor is not for everyone, some people find the interface difficult to use and others just don't like it or find learning a new application is too much trouble.
So, If you are looking for an alternative to Elementor, here are some popular options;
Beaver Builder
Beaver Builder is very well known for its user-friendliness, and developers widely use it because of its ease of functionalities and solid code structure.
It's not just a page builder; in a way, you can say it's a complete toolkit for developers where they can find everything related to building a WordPress website.
 Visit Website
 Beaver Builder pros and cons
Pros
- Beaver Builder's interface is incredibly user-friendly, where you can drag-and-drop elements in different rows and columns.
- A real-time frontend page builder where you can visualize the live changes made by you.
- Add your content, style it, and then save it as a template to reuse it, it will save your time and speed up the process of the website customization process.
- Save your time by using any of 30+ ready to use design templates.
- Beaver Builder is extremely lightweight and works blazingly fast, so there are no chances of slowing down your website.
- Beaver Builder Pro version comes with multisite support and network-wide settings where you can also build your website builder platform.
- Beaver Builder perfectly integrates with WooCommerce plugins that enable its users to create amazing WooCommerce store pages with easy cart & checkout pages customization options.
- Create SEO optimized layouts using Beaver builder with multilingual support.
- Best outclass support team, ready to serve the people who find any kind of difficulty with the Beaver Builder plugin.
- Excellent page builder choice for Agencies, also white label option for agencies who wish to use their branding on their customer's site.
Cons
- The plugin development process isn't as fast as other page builder's
- Beaver Builder's cheapest plan starts at $99, which is a bit overpriced as compared to Elementor or Divi plans; however, if you look at the fact that Beaver builders even cheapest plan works on an unlimited number of the website, then you might not regret.
- Modules and elements limited in options
- No Form Builder option with beaver builder
Divi Page Builder
Divi has a huge follower base and powers more than 437,821 WordPress sites worldwide. Divi theme, in combination with its page builder, has stormed the WordPress market by all means.
What are the reasons for such a massive hit? Here are some glimpses of great features along with its shortcomings.
 Visit Website
 Divi page builder Pros and Cons
Pros
- Frontend Drag-and-drop builder with a live view of the real-time changes.
- Divi page builder Duo with Divi Theme has proven synchronization in one pack, that's the reason behind huge userbase.
- A live frontend editor where you can see all the changes made without refreshing the page.
- The heavenly "global element" option lets the users create as many sections or elements they like and reuse them later on.
- A user-friendly intuitive interface
- Get your feet wet with the extensive tutorials and dedicated youtube videos on Divi blog to assist you in creating customized layouts.
- 18-premade templates
- Responsive layouts
- A/ B testing allowed
Cons
- No popup builder included in Divi page builder
- Beginners may get overwhelmed when they see too many options on the interface.
- The support team is very unprofessional, and it may take days to get a response from the support system.
- Divi builder is not as fast as another page builder such as Beaver or Elementor
- The real shortcoming is Divi uses shortcode based builder, which is if you have created your website using Divi builder, moving away from Divi can end up in a total mess.
Themify Builder
Themify builder is an ideal builder for those you like to work using both frontend and backend editors. It's a drag’n drop builder that helps you create styling pages quickly.
Themify builder's unique features may help you in creating your layouts.
 Visit Website
 Themify builder Pros and cons
Pros- The Themify builder comes with all Themify themes, and you need not purchase it separately. However, it works smoothly with all WordPress themes and can be used on any Theme.
- Drag’n drop facility to try any element on creating your design.
- Live preview will let you see changes made by you to your layouts.
- Work using both Frontend or Backend Editor
- Undo/ Redo option to reset your mistakes quickly
- Use the Copy/ paste option to move any row/ column on next page quickly.
- 40+ pre-designed templates
- 60+ animation effects
- Duplicate modules and use them as premade templates on your next pages.
- Works seamlessly with all major WordPress plugins; Mailchimp, WPML, Yoast
- Responsive layouts and Multisite support.
- No header and footer builder
- Limited theme builder features
- The interface lacks in user-friendliness
WP Bakery Page Builder
Wp bakery, formally known as a visual composer, is our forth page builder that we are going to discuss.
WP Bakery is another great page builder with its unique features that allow its users to customize any corner of their pages or posts layouts. Let's explore why it is very popular in the WordPress market.
 Visit Website
 WP Bakery Pros and cons Pros
- frontend and Backend editor support
- Drag’n drop option helps in customizing almost every corner of your page layouts
- Works seamlessly with any WordPress theme
- Compatible with WPML and multilingual support
- RTL compatible
- Responsive preview mode
- Compatible with WooCommerce plugins
Cons
- WP Bakery doesn't support live preview, and you have to save and then manually click on update to see the changes you made.
- The page builder works very slow, and you have to wait anywhere from one second to more to get an updated version come back.
- Not an intuitive UI, also working with image Gallery module is a serious heck.
- Another frustrating shortcoming is that it stores your content in shortcodes, and it's really difficult to switch to another page builder because the content uses shortcodes and is compatible with wpbakery only.
Page Builder by SiteOrigin
SiteOrigin page builder is a free page builder by SiteOrigin, which you can install on as many websites as you like, and it works fine with all free and premium themes. Also, it helps you in customizing your site's design without requiring any need for expertise in coding.
 Visit Website
 Page Builder by SiteOrigin Pros and Cons
Pros
- Intuitive content editing interface where you can easily drag’n drop elements
- It is compatible with almost all WordPress themes so you won't lose any content if you try to switch to any other page builder
- The page builder is built with strong SEO friendly codes that's why its lighter than any other page builder.
- History tab will keep track of all the edits you made previously
- If you like to add new sections or elements, then there is an option of widget bundle plugin by SiteOrigin
- Use SiteOrigin documentation if you like to see how it works
Cons
- No live preview facility.
- It comes with a slime editing option; you can create a basic website with it; however, it not a good fit for a full-fledge website with lots of customization options.
How to set up cpa landing page with Elementor
The Elementor page builder is one of the most popular page builders in the WordPress community right now, and it's no surprise that it can be used for building CPA landing pages.
It has many features that make building any landing page as easy as dragging elements in customizing. In this article, we will set up a CPA landing page using the elementor page builder from scratch.
What better way to learn than by example, I have designed a CPA landing page for collecting Weight Loss leads using Figma and in this setup, we’re going to set up my design on a live website using the elementor page builder.

Things You Need for this Setup
- A CPA Offer
- A WordPress Website
- Elementor Page Builder
- Any Fast Theme (ASTRA - recommended)
- Wp Forms (Optional)
Setting Up The Elementor Page
Before We start with the actual setup, there’s a couple of page settings we need to setup. Go to to WordPress and create a new page and click on the Edit With Elementor Button.
Once the page builder loads up, click on the settings icon at the bottom left of the toolbar.

You would need to set the Page Layout to Elementor Canvas as we will not be using any theme styling while building our CPA landing page.

Once that’s done, we can now start building the CPA landing page from the design.
Building The CPA Landing Page Structure
We are going to start out by structuring out the page on the elementor page editor.
As you can see from the design image, we have a background image with a white background.
The page has just one column and all the elements are centered a little bit to the left.
This a fairly easy task using the elementor page builder, to make it easier we’ll break it into 12 steps.
Step 1:Changing the Background
We’ll start by adding a single column row on the editor


Click on the Structure to bring up the settings panel at the left, simply navigate to the Style Tab and add a background image.

I have already uploaded the image on my WordPress gallery, you can easily do that after clicking the image option at the settings tab.
Here. we will select a background image and add it as the background of the page.

Once you have the background image selected, make sure you set the image settings to match the image below.

And that should do it for the Background image. We’re going to do one extra setting before moving to the next step which setting the Section Height and a few other settings.
To do this, go back to the Layout Tab and configure as seen in the image below.

That’s all we need to do for the background and page layout. This is what we have so far.
Step 2:Adding Content
This is the easiest part of this setup actually, you just have to drag and drop elements with little customization and that’s about it.
For the first two text elements, we can use the Heading element easily by dragging and dropping it in.
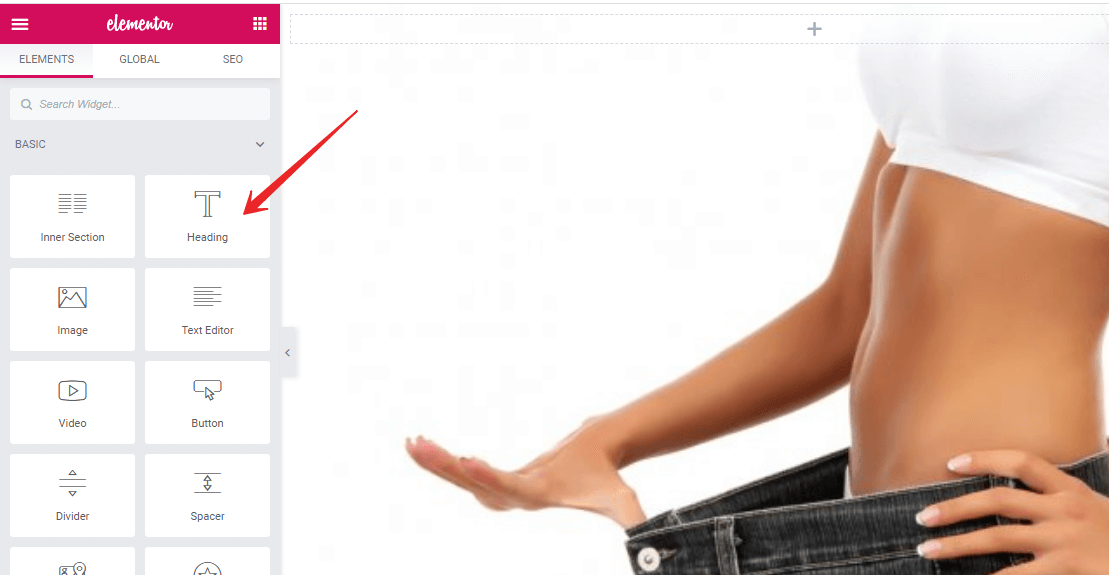

If you noticed, the Heading element is too close to the top of the page, we can solve this easily by adding padding-top to the section, so just like before click on the section top icon to bring up the settings tab for it.
Once there, navigate to the Advanced Settings Tab and add about 70px to the padding-top to fix the issue.

Now we can go back to customizing the text element, the font used for the CPA landing page text is OPEN SANS and the color is obviously black so we’re going to make all the changes.
Click on the Heading Element and change the text to what you like, then navigate to the settings panel, and under the Style Tab make sure it’s similar to the image below.

To center the text, navigate back to the content tab, and select the center to align option.

Ok, that’s about right but not yet perfect. We’re still missing out on the green highlight for the word WEIGHT as well as a line break the word FAST.
To add solve these two issues, we just need to add some special HTML makeup to the content like the image below.

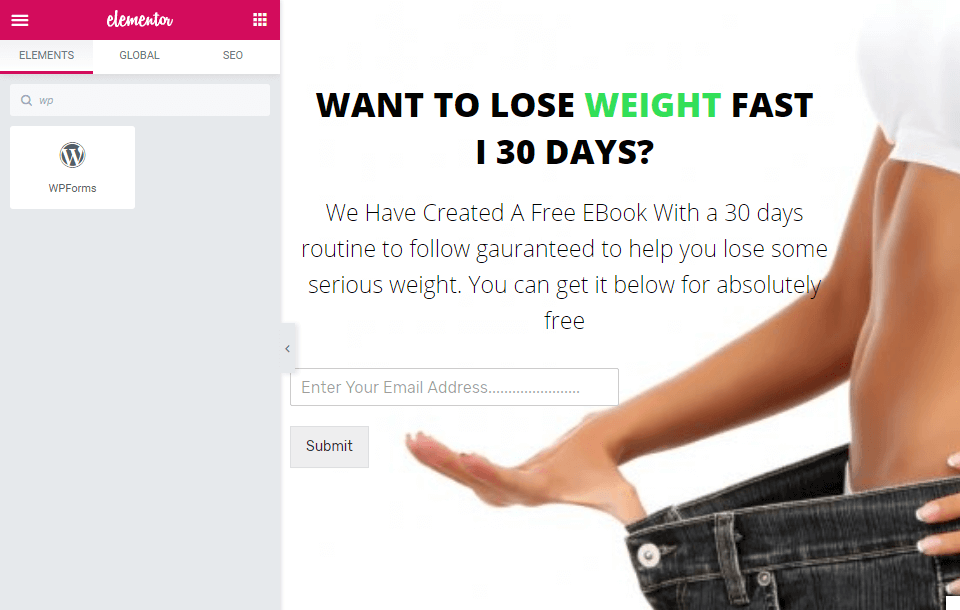
I edited the text to look like:
WANT TO LOSE WEIGHT FAST
I 30 DAYS?
It’s looking ok, but we would need to add some line spacing to make it better, you can do that by navigating back to the Style Tab and selecting Typography. Add as much as you need.
With that done, we’re going to move to the next element which is quite simpler. Just drag and drop in the Heading element below the first and make the styling look like the one below;


Ok, now we have a small problem, the elements are centered to the middle of the page;

Which make it overlay with the picture.
We can easily fix this by adding about 500px padding-right to the section.

And Voila, it’s all fixed now.
After that, we’re moving to the final step of this setup which is creating the Form and button.
Step 3:Adding The Form
In most cases, your CPA offer might just be a link to purchase something online or to register on a page.
I added in the form for this setup because what professional CPA marketer does is build a list first before sending out the CPA offer.
Anyone interested in a free 30-day weight loss Ebook would surely want to buy a Weight loss product, this is best practice, always collecting emails first before sending offers.
But if you want to get people to your offer directly, simply add a button alone with a link to your offer and leave out the form.
With that out the way, let’s finish building this.
There are a lot of form plugins in the WordPress Repo that can do this but I prefer using Wp Forms integrated with my GetResponse Email Marketing Software account.
I’m trying to keep this setup simple so I won’t be including the integration part, just install Wp Forms and follow along.
Adding the Form
First off, we’re going to create a new form with Wp Form.

Select the Newsletter Form option.

This is the default layout of the Newsletter template provided by WP Forms, we first have to get rid of all the fields we don’t need according to our design.

Much Better, I also removed the label and added a place holder instead to fit our design.

Ok, it’s not looking as good as we want it to but with some extra Custom CSS, we can totally change the default look.
The last thing left is adding this to our CPA landing page, we do this by using the WP Form element.

Just drag and drop this below the second element and it should look like this
As you can see from the image, the form is not styled how we would want it. I have added some extra CSS to it to get it to look like this.

Identical to our design right? In most cases you wouldn’t even need a perfect form anyways, I just wanted to show you that it’s possible to add forms if you would like to take that route.
With everything settled, here is the final CPA landing page. All that’s needed now is to publish and drive traffic to it.
Conclusion
In this article, we have gone over step by step how you can set up a CPA landing page using a sample offer & a custom design using the Elementor page builder.
The steps explained here can be used for any kind of CPA landing page you're trying to set up no matter the niche.
If you've found this article helpful or you have any questions please reach out via the comment section below.
How to Replace Homepage with new Elementor Page
Your homepage is the first impression of your website, and it should look awesome to grab your visitor’s attention instantly.
If you like to create a new stylish Homepage of your site with lots of styling options and custom design, then this tutorial is for you.
This step by step tutorial focuses on how you can create a homepage of your website using the Elementor plugin from scratch.
Step 1 - Install Elementor
To start with, you have to install the Elementor page builder from the WordPress repository as follows.
How to install Elementor page builder
Go to your Dashboard> Plugins > Add new > enter the keyword “Elementor” in the search bar > install and activate.

Once you are done with the Elementor page builder installation, the next step is to move on to your Dashboard so we could create our Home page from scratch.
Step 2 - Create a new page
When you move over to your Dashboard, you will see a “Create a New Page” option, or you can go to the Pages > Add New Page
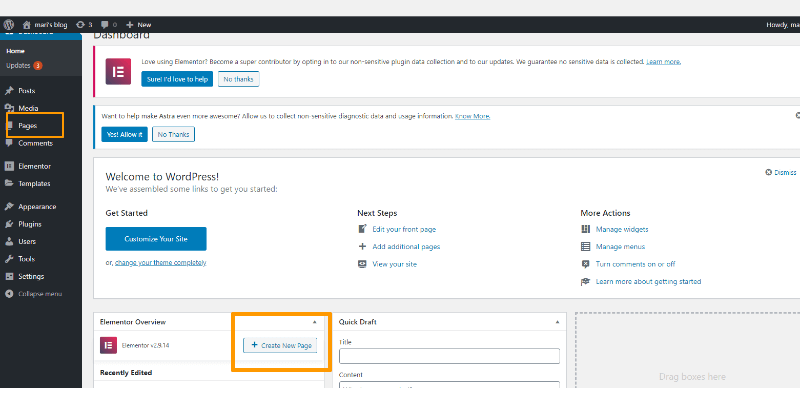
If you click on “add a new page,” it will lead you to the new page with an option of “Edit with Elementor”.
If you select this option, you will enter into the Elementor interface.
Here, you can see the basic elements that we are going to use in creating our homepage. There are basic elements, then General and also WordPress widget access. Although you have access to the WordPress widget section, yet we can do pretty much by using basic and general tabs only.
Step 3 - Edit the homepage settings
If you notice at the lowermost bottom corner on the left side, there is a setting button, and clicking on the setting tab, you will enter into the page setting area where you can edit the Homepage Name, page status and hide or show the title of your page settings.

Also, you can change the status of the page from the status tab; I am going to keep it as a draft and then I’ll select “no featured image”, also, I am going to hide the title name by sliding on the hide title tab.
Step 4 - Select the Page Layout
Now, another important settings section is Page layout, where you’ll find three options.
- Default
- Elementor canvas
- Elementor Full width
The difference between these is that if you select the Elementor full-width tab, you’ll have a homepage with the header and footer section imported from your theme, while you can create the content using the full-width area.
However, if you choose the Elementor canvas, the header and footer section wouldn’t be imported from the theme, and you will have a completely blank page without any header or footer. And we are going to select the Elementor canvas option because we are going to create everything using the Elementor sections.
So, when you have set everything, you can click on the publish area to get your home page published.
Now, if you like to access your Dashboard area, you can click on the three bars on the Left corner

There, you can see the exit option to exit to your dashboard area.
So, let’s head over to our Dashboard and do some other important settings.
Final step - Homepage Display settings
If you already have a Homepage and trying to replace it with the Homepage build with Elementor, then you can reset your default homepage with Elementor Homepage from the settings section. Move to the Settings area > Reading settings > set the Homepage display setting as a static page and turn on the Homepage option to the homepage you created with the Elementor and then save the settings.

Hurray! You are all done with the Homepage basic settings and created a new Elementor homepage.
Here is how your Homepage is going to look like – completely Blank
That’s how it’s going to look like when starting to edit.

Now, If you like to see how I am going to design my Homepage using the Elementor styling elements, then stay tuned to our next episode with complete designing tutorial of Homepage using the Elementor page builder.
Elementor Video Tutorials
Here are some great video tutorials to help you learn more about using Elementor to build your WordPress website.
[VIDEOLIST]